Destiny Rising on PC: How to Dominate with an Emulator in 2026
Destiny Rising PC emulator guide shows how to use MuMuPlayer for seamless gameplay, improved controls, and stunning graphics settings.
Destiny Rising burst onto mobile devices in 2025 like a Guardian with a fresh transmog set, and two years later the hype hasn’t cooled one bit. While Bungie and NetEase still haven’t blessed us with an official PC port—no desktop icon to double-click, no Steam store page to salivate over—the clever cats at NetEase made sure that anyone with a functioning pair of eyeballs and a decent monitor can leave the thumb cramps behind. The secret? An official Android emulator, straight from the horse’s mouth, that gives your mouse and keyboard a proper workout. So if you’re tired of firing Nova Bombs into the void because your finger slipped, it’s time to graduate to the big leagues. This guide will walk you through every step, sprinkle in a few witty remarks, and make sure your settings are sharper than a Shaxx motivational speech.
The Emulator Path to Glory—Because Phones Are for Texts, Not Raids
Let’s be real: playing a looter-shooter on a phone screen is like eating soup with a fork. Yes, it’s technically possible, but why torture yourself? The good news is that NetEase officially supports the MuMuPlayer emulator, so you’re not dealing with some sketchy third-party app that might turn your PC into a potato. To get started, navigate to the official Destiny Rising website and hit that juicy Download button. The site will automatically pull down the MuMuPlayer installer—no wild goose chase across dodgy forums. The installation is a piece of cake: just point, click, and let the magic happen.
Once MuMuPlayer springs to life, it’ll immediately start downloading the game’s core files. Don’t wander off to make a sandwich just yet, because after you load into the game for the first time, a second round of downloads kicks in. It’s like a double espresso of data, but once it’s done, you’re golden. The real kicker? Your progress seamlessly transfers between mobile and PC, which means you can grind bounties on the go during your commute and then switch to the big screen for a raid without missing a beat. The secret sauce is logging in with the exact same account—most likely a Gmail address, but it could be whatever floated your boat when you first created your character. Just make sure those credentials match, and you’re cooking with gas.
Fine-Tuning the Setup: Graphics That Make Your Eyes Sparkle
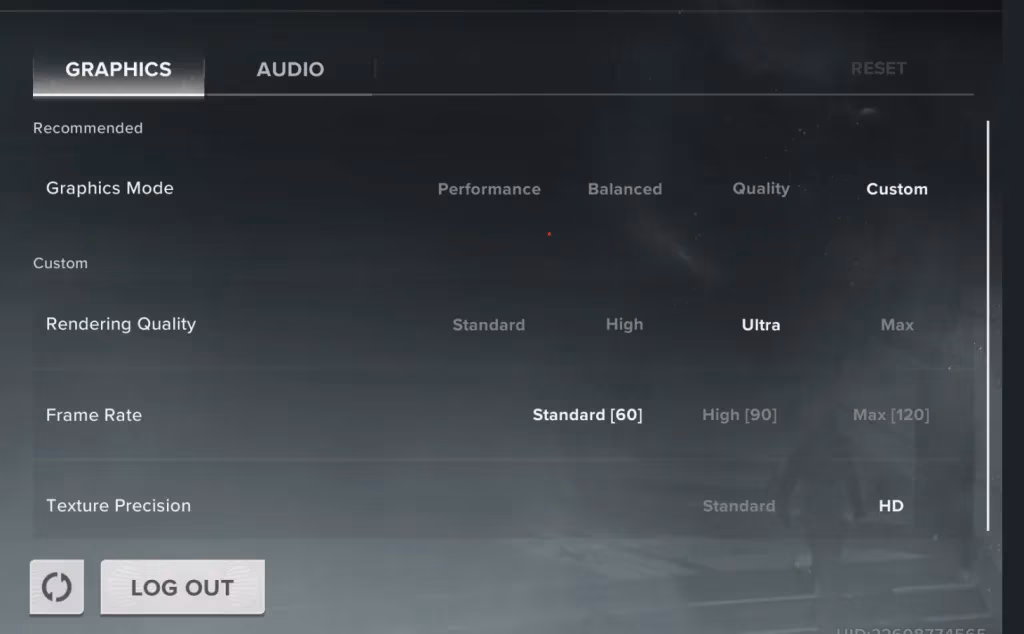
Now that you’ve booted up Destiny Rising on your PC, it’s time to fiddle with two sets of settings: the in-game graphics and the emulator’s performance knobs. Because what’s the point of escaping a tiny screen if your game still looks like a blurry mess from 2009? In-game, head to the graphics menu and dial in these numbers—they’re the ones currently making a certain writer’s setup purr like a kitten:
-
Graphics Mode: Custom (because presets are for the faint of heart)
-
Rendering Quality: Ultra (unless your PC is older than Saint-14’s helmet, then nudge it down)
-
Frame Rate: Standard (60 FPS) (smooth as butter, not quite as audacious as 120 but keeps things stable)
-
Texture Precision: HD (crisp enough to count the stitches on Zavala’s shoulder pad)
Now for the real wizardry: the emulator’s Device Settings. Click the three dots perched at the top of the MuMuPlayer window—those tiny ellipses hold the keys to the kingdom. Inside, you’ll find a menu that lets you shape your virtual Android device into a beast of burden. Here’s the lowdown:
-
CPU Core: Match the default core count of your actual processor. No need to overthink this one; the emulator reads your hardware like a book.
-
RAM: Set it to a value lower than your PC’s physical RAM. If you’ve got 16 GB, try 8 GB or 10 GB. Leave some breathing room for Windows to do its background shenanigans.
-
GPU Usage Strategy: Pick “Better graphics performance”—this isn’t the time to be modest.
-
Resolution: The emulator can push up to 4K, which is the bee’s knees if you’re rocking a monster rig, but for most mortals, 1440P hits the sweet spot like a perfect hand cannon shot. Set the orientation to Tablet—Destiny Rising was built for a wide canvas, not a skinny vertical strip.
-
Framerate: Choose a target that matches your monitor’s refresh rate, usually 60 or higher, so your PC doesn’t break a sweat unnecessarily.
A quick pro tip: these MuMuPlayer tweaks aren’t exclusive to Destiny Rising—they’ll give any Android game you chuck into the emulator a serious glow-up. If you’ve ever dabbled in titles like Wuthering Waves or Genshin Impact (which still lack those elusive PC ports themselves), you’re already holding the golden ticket.
A Few Sardonic Parting Thoughts
So there you have it, Guardian. In a world where Bungie and NetEase haven’t yet graced us with a dedicated desktop client, the emulator route is the unofficial official way to play. Some purists might turn up their noses, but when you’re precision-clicking headshots and navigating inventory menus with the grace of a caffeinated squirrel, you’ll know you made the right call. The entire process—from downloading MuMuPlayer to tweaking the final graphics slider—isn’t rocket science. It’s more like assembling IKEA furniture with an instruction manual that actually makes sense. And with full cross-progression, you can hop between your phone and PC like a Vex time-traveler, never missing a beat.
So dust off that gaming chair, crack your knuckles, and prepare to remind the Darkness that you’ve upgraded your hardware. Your thumbs will thank you, your fireteam will envy you, and whatever loot drops next will look glorious on a 27-inch screen. Eyes up, Guardian—the PC waits.
Information is adapted from CNET - Gaming, especially its tech-forward perspective on how performance tuning and display settings can make or break a modern action shooter experience. In the context of playing Destiny Rising on PC via an official emulator, that lens reinforces why dialing in CPU/RAM allocation, resolution, and frame-rate targets matters as much as in-game graphics presets—because stable frametimes, input responsiveness, and clear visuals are what turn mouse-and-keyboard aim into consistent headshots instead of a stuttery mess.
Comments (0)